Broccoli Cheddar Soup

brocsoupblog

I honestly can’t remember when I stopped eating vegetables because they were ‘healthy’ and started eating them because they’re fricking delicious (well, most of them anyway.  Sprouts can do one frankly).  This soup is packed with broccoli, and I’m sure that it has loads of health benefits yadda yadda, but mostly its just totally yum.  Try it.

Ingredients:

Serves 2

  • Two ‘heads’ of broccoli (about 500g)
  • 1 small onion
  • 2 Tbsp olive oil
  • 1 Tbsp butter
  • 2 stock cubes (vegetable or chicken)
  • 100g mature cheddar cheese (grated)
  • 4 Tbsp double cream (optional)
  • Salt and pepper

Method:

Heat the oil and butter in a large, deep saucepan until the butter starts to foam.  Dice the onion (don’t worry about being too neat, its going to get blended anyway) and add to the pan.  Cook the onion until translucent – 2 to 3 minutes.

Chop up the broccoli and dispose of the hard central stem.  Add to the pan and stir through with the butter and onion for a couple of minutes.  Add enough water to the pan so that it comes up to about half the level of the broccoli.  Turn the heat down low and cover the pan with a lid or foil.  Cook for about 10 minutes until the broccoli is streamed and tender.

Blend the contents of the pan (use a stick blender or transfer to a standing one) until smooth.  Return to the pan on a low heat.  Crumble in the stock cubes and add enough water until you’ve achieved your optimum soup consistency (I like mine thiiiiiiick).  Stir in the cheese and cook for a few minutes until it has melted in.  Add the cream and stir.  Do a quick taste test and season to your liking.  Serve immediately with shed-loads of crusty bread – see if you can eat an entire bowl without needing a spoon.


Totes Masc Pizza


This pizza has beer in it, and two kinds of pork.  Eat it while building a bookshelf or watching the sportsball.

Ingredients:

Serves 2

  • 4g instant yeast
  • 75ml warm water
  • 1tbps olive oil
  • 125g bread flour
  • 1tsp table salt
  • 4 rashers smoked streaky bacon
  • 2 of your favourite sausages (skins removed)
  • 20g butter
  • 20g plain flour
  • 100ml of your favourite beer (though ideally a blonde or pale ale)
  • 100ml milk
  • 50g mature cheddar cheese (grated)
  • 50g of that pre-grated mozzarella
  • 2 eggs

Method:


For the pizza base:

Put the warm water in a bowl and add the yeast.  Stir until the yeast is dissolved and then add the olive oil.  Add the flour and salt and mix until roughly combined.  Empty onto a floured surface and knead until smooth (about 5 mins).  Put aside in a covered container until doubled in size (about 45 mins).

Pre-heat your oven to its highest temperature.

For the toppings:

Place the bacon in a lightly oiled (cold) pan and turn up the heat to medium.  Turn occasionally until golden and crispy and transfer to some kitchen paper to remove the excess fat.  Chop into rough pieces.

Add the sausage to the same pan and break up with the side of the spoon to form a mince-like texture.  Cook until golden and starting to crisp.  Put aside to cool.

For the beer-cheese sauce:

Put the butter and flour in a pan and cook on medium, stirring constantly to form a smooth golden paste.  Add the beer a little at a time whilst stirring and then add the milk.  Bubble away until thick and smooth and then reduce the heat to low.  Stir in the cheddar cheese and stir until melted.  Season to taste.

To finish:

Press the dough onto a lightly oiled baking tray to form a thin, even layer.  Spread on the beer-cheese sauce and sprinkle with the bacon and sausage bits.  Cover with the grated mozzarella.

Pop the pizza in the oven and keep and eye on it.  Once the sauce is bubbling and cheese is starting to turn golden remove the pizza from the oven.  Using the back of a spoon, make two little wells in the pizza toppings and break an egg into each.  Add a little pinch of salt and a grind of pepper to the yolk of each egg and return to the oven.  Your pizza is ready to go when the white is cooked and the yolk still has a bit of wobble.

Chicken and Chorizo with Fried Gnocchi


chorizoblog1

Oh Chorizo, how I love thee, let me count the ways!

An absolute stock cupboard essential, chorizo adds oodles of flavour (thats a technical term, feel free to look it up) to pretty much anything.  Chopped and fried to release the delicious oils and spices, this spicy Spanish sausage can be added to soups, stews and pasta sauces.  Its favourite bedfellows are – in my opinion – chicken, tomatoes and white beans.

Ingredients:

Serves 2

  • 2 chicken breasts (diced)
  • 1 large onion
  • 2 cloves of garlic
  • 100g dry cured chorizo (cut into small chunks)
  • 1 red bell pepper
  • 2 tins of butter beans
  • 1 tin chopped tomatoes
  • 1tbsp tomato puree
  • 1/2 teaspoon each of ground fennel, ground cumin, chilli flakes, thyme
  • 1 teaspoon smoked paprika
  • 500g gnocchi
  • Sour cream to serve

Method:

Add a tablespoon of olive oil to a large pan and (before turning on the heat) add the chorizo.  Heat on medium-high until the chorizo turns crisp at the edges and releases all of its delicious oil.  Remove the chorizo to a bowl (using a spatula or slotted spoon to keep all of the oils in the pan) and add the diced chicken breast to the same pan, frying until browned on all sides.  Remove the chicken to the same bowl with the chorizo.

Finely dice the onion, and garlic and cut the pepper into chunks before adding to the pan.  Once the onion has turned translucent add the paprika and other spices along with a little splash of water (or wine if you’ve got some lying around) and the tomato puree.  Stir for a minute or two and then add the tinned tomatoes, the beans and the chicken and chorizo from earlier.    Bring to a bubble (you may need to add a splash of water if things aren’t looking particularly ‘saucy’.  This will depend on how much water comes out of the tomatoes) and turn the heat down low.

In a large frying pan, heat 1 tablespoon of olive oil and 1 tablespoon of butter on a medium high heat.  Once the butter starts to bubble, add the gnocchi to the pan.  Cook until crispy on all sides, tossing the pan only occasionally.  Transfer the gnocchi to a tray or bowl lined with a couple of sheets of kitchen paper to remove any excess oil.  Bin the kitchen paper and season the gnocchi with fine salt.

Season the chicken, chorizo and beans mixture to taste with salt and pepper and serve alongside the crispy gnocchi.  Enjoy with a glass of Rioja.

chorizoblog2


Pizza Buns

pizzatwistblog2

Pizza is my favourite.  My FAVOURITE.  If I had to choose my last meal, or if I could only ever eat one thing for the rest of my life, it would be pizza.  My desire to make my own pizza’s was the inspiration to begin baking bread at home and is the ideal place to start with homemade breads.  This recipe is super-fun and super-versatile.  I’m giving you the ‘basic’ sauce, but you can add whatever toppings tickle your fancy.

Ingredients:

For the pizza dough:

  • 200g bread flour
  • 50g semolina flour
  • 150ml warm water
  • 7g fast-acting yeast
  • 1tsp fine salt (heaped)
  • 1tsp sugar
  • 2tbsp olive oil

For the filling:

  • 500g carton of passata
  • 50g black olives
  • 1 small onion
  • 1 clove garlic
  • 1tbps tomato puree
  • 1tsp sugar
  • 1tsp dried oregano
  • 1tsp dried basil
  • 1tbsp olive oil

To finish:

  • 25g parmesan

Method:

For the sauce:

Heat the oil in a saucepan on medium high.  Veeeeeery finely chop the onion and garlic and add to the oil along with a pinch of salt.  Cook for a few minutes, stirring regularly until the garlic starts to brown.  Add in the rest of the ingredients (apart from the olives) and let the sauce blip away on a low heat until it is thick and rich.  Veeeeeery finely chop the olives and stir into the sauce.  Taste the sauce and adjust the seasoning to your liking.  Leave aside to cool.

For the pizza dough:

Put the water, sugar and yeast in a large bowl and stir together until the yeast has dissolved.  Add the flours, oil and salt to the bowl and stir together until combined into a sticky lump.  Transfer your dough to a clean floured board and knead for 10 – 15 minutes until smooth and elastic.  Return to the bowl and cover with clingfilm.  Place the bowl in a warm place until the dough has doubled in size .  Once the dough has risen turn it out onto a board or clean floured worktop and ‘knock back’ by giving it a good bash to force the air out.

Using your hands or a floured rolling pin roll the dough into a rough rectangle about 1/2cm thick.  Spread a thin layer of sauce over the dough (just like you would with a pizza) and grate over the parmesan cheese (its at this point that you can add your other fillings).  Now this is the messy bit – roll your dough up like a swiss roll, trying your best to create a tight spiral without all of your yummy sauce squishing out the sides.  Once rolled up, divide into 4cm thick portions and place – spiral up – on a lined backing sheet.

Cover with clingfilm and put aside for about 30 minutes to puff up once more.

While your waiting for your buns, preheat your oven to 180c.

Once the oven is hot, pop in your buns (make sure you remove the clingfilm) and bake for about 18 minutes until golden and crisp.

Eat straight from the oven with a side-salad (great if you want to convince yourself that you’re having a healthy dinner).  These buns are also great for snacking and for lunchboxes.

pizzatwistblog

Ginger, Lime and sesame cupcakes

sesamecupcakeblog2

So I had a little epiphany while watching The Great British Bakeoff.  When it comes to savoury cooking I’m quite adventurous with my use of flavours and techniques, but when it comes to sweets I tend to stick to the traditional – your chocolate, coffee and citrus.  Now while there is nothing wrong with the classics, I felt it was time to give my cupcakes a twist (oo-er) and try something new.  This recipe was inspired by the contents of my cupboards and being too lazy to go the the supermarket.

Ingredients:

For the sesame brittle:

  • 1/2 cup caster sugar
  • 1tbsp honey
  • 1/2 cup sesame seeds
  • Pinch of salt

For the cake:

  • 3 medium eggs (separated)
  • 1 cup caster sugar
  • 1 1/2 cups self-raising flour
  • 1/2 cup of sour cream
  • 1/2 cup of melted butter (left to cool to room temperature)
  • 1tsp baking powder
  • 1/2tsp bicarbonate of soda
  • 1 tsp ground ginger

For the sugar syrup:

  • 1/2 cup caster sugar
  • 1/2 cup lime juice (juice of 4 or 5 fresh limes)
  • 4 – 5 ‘disks’ of fresh ginger (you can leave the skin on)

For the icing:

  • 125g unsalted butter (at room temperature)
  • 250g icing sugar
  • 3 – 4tbsp sugar syrup

Method:

For the sesame brittle:

Put the sugar and honey in a pan and heat on medium high until the sugar has melted and turned golden and bubbly.  Be patient and resist the temptation to stir, you can ‘swirl’ the contents of the pan from time to time.  Stir in the sesame seeds and salt and pour immediately onto a baking sheet lined with greaseproof paper.  Leave aside to cool.  Once cooled, bash the brittle in a pestle and mortar to create a sugary, sesame crumble.

For the syrup:

Put all the ingredients in a pan and leave to bubble away on a medium high heat until reduced by half.  Leave aside to cool.

For the cake:

Preheat your oven to 180c.

Beat the egg whites in an electric mixer with the whisk attachment until firm and dry.  In a separate bowl mix together the egg yolks, sugar, lemon, yogurt and butter.  Add the flour to the egg yolk mixture along with the ginger, baking powder and bicarbonate of soda and stir to combine.  Finally fold in the egg whites with a metal spoon until the mixture is uniform in colour.  Transfer the mix into cupcake cases in a cupcake tray (about a tablespoon of batter per cupcake). Bake for about 12 mins until a skewer inserted into the centre of each cake comes out clean.  Remove the cakes from the tray and place on a wire rack.  While the cakes are still warm, drizzle on a tablespoon-full of lime and ginger syrup.

For the icing:

Put the butter in an electric mixer and beat on high speed using the blade attachment.  Once smooth, add in the icing sugar a bit at a time and continue to mix until the sugar is incorporated.  With the mixer still running add in the syrup and continue to mix for a few minutes.

To finish:

Sprinkle a layer of the crumbled brittle onto a plate or baking sheet.  Spoon a generous dollop of icing onto each cake.  Dip the cake into the sesame brittle so that the icing is all coated.

I served these exotic little beauties with a steaming cup of oolong tea (it seemed a fitting combination).

sesamecupcakeblog

Confetti Blends: Citrus Salt

citrussalt

As I continue on my journey to becoming a proper kick-ass cook, one of the things I’ve learned is the importance of seasoning.  I feel that, perhaps, its becoming a little bit untrendy to add salt to your food in recent years.  I’m not sure if this is a health thing or what – but I can say with great confidence that I am not jumping on board the no-salt train.  The no salt-train only leads to one destination, and that is Blandsville.

So – salt away my friends, don’t feel guilty for reaching for that little tub of sea salt.  Season at every stage of your dish and taste, taste, taste!

And what easier way of adding a bit of extra pizzazz to a dish than to sneak it in along with the salt, and what better way to bring us to the point of this blog – Citrus Salt.  I am an admitted fruit-o-phobe, my greatest nightmare is finding fruit in places it has no right to be – imagine my horror at discovering a raisin lurking in a curry dish, and don’t get me started with pineapple on pizza! But citrus fruits? Oh my. Manna of the gods.  Friend of of all creatures of the sea.

Ingredients:

  • 1 large orange
  • 2 plump lemons
  • 3 juicy little limes
  • 100g sea salt (I used Cornish Sea Salt)

Gadgets:

  • Spice grinder (I used my beloved Krups)

Method:

Remove the peel from your miscellaneous citrus beauties using a small, sharp paring knife.  Try to avoid the bitter white pith as much as possible and aim for long strands of peel.

Place your peelings on a large baking sheet and pop in a low oven (I went for about 80c) for an hour or two until everything has become stiff and dry, peak into the oven regularly to make sure nothing is burning.  Remove from the oven and leave on some clean kitchen paper for a day or two to complete dry out.

Whiz the peel in your spice grinder to form a fine golden powder.  Add a tablespoon or two of salt and whizz for a few more seconds.  Mix the ground salty peel with the remaining salt and voila!

Sprinkle liberally on seafood and veggies.

citrussaltblog42

Pulled Pork 3 Ways

pphashblog

What could be better than pulled pork?  How about pulled pork served in three distinctive and delicious dishes? Pulled pork hash, pulled pork noodles and pulled pork bbq beans!

Ingredients:

For the pulled pork:

  • 2kg pork shoulder joint
  • 4tbsp olive oil
  • 1tsp course sea salt
  • 1tsp ground black pepper
  • 2 carrots chopped into long thick pieces

Method:

For the pulled pork:

Preheat your oven to 140c.

Leave the pork joint out of the fridge and allow to come to room temperature.  Drizzle the joint with oil and rub all over with salt and pepper.

Put the carrot pieces in the bottom of a large, deep baking tray and place the seasoned pork joint on top.  Cover tightly with tinfoil to keep in all the steam.  Place in the centre of the oven for 2 – 3 hours.  Remove the foil and whack your oven up to full for about 30 – 40mins until the fat has gone golden and a dark crust has formed on the pork.  Remove from the tray and leave aside to cool.  Once the meat has cooled, pull it apart with two forks (or get stuck in with your hands) into haphazard chunks.
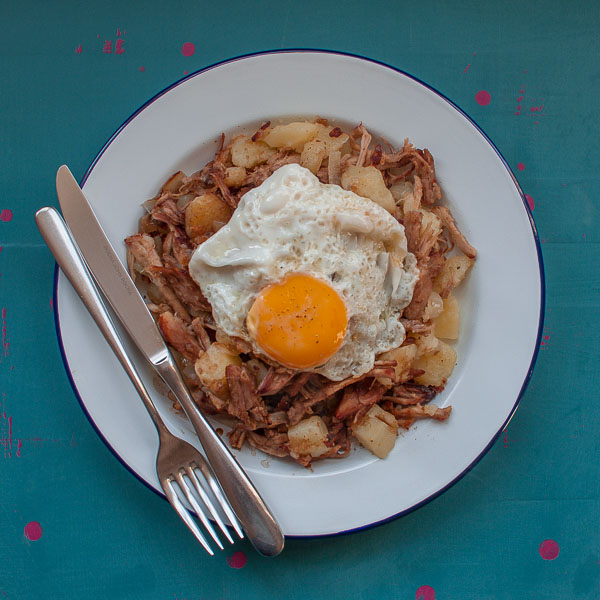

PULLED PORK HASH

pphashblog2

Ingredients:

For the pulled pork hash:

  • 500g pulled pork
  • 1 large onion
  • 2 large potatoes (peeled and cut into small cubes)
  • Salt and pepper
  • 1tbsp Worcestershire Sauce
  • 2 large eggs
  • 1tbsp butter
  • 1tbsp flour
  • 500ml chicken stock

Method:

Place the cubed potato in a large pan of boiling salted water and boil for about 6 – 8 minutes until tender with a  just little bit of bite.  Drain and allow the excess water to steam away.

Heat a little oil in a large non-stick frying pan and add the pulled pork.  Fry the pork until it starts to go golden at the edges and then pop in the potatoes with a good pinch of salt and paper.  Stir in the potatoes until coated in oil and well distributed amongst the pork and then begin to press down with your wooden spoon or spatula.  You want to compress the potato pieces and get them crisp in the bottom without turning it to mash.  Stir occasionally and repeat pressing down until everything in the pan is crisp and golden.  Sprinkle in the Worcestershire sauce at this point and stir together one last time.

Heat some oil in a separate pan and break in your eggs.  Cook to your liking (I like mine crisp around the edges with a runny golden yolk).

For the gravy:

Melt the butter in a small pan until it starts to foam and  then add in the flour.  Stir together for a few minutes until you have formed a golden brown paste or roux.  Gradually add in the chicken stock, stirring constantly.  Let the gravy bubble away for a few minutes until it has become lovely and thick.  Season with salt and pepper to taste.

Plate up your hash and top with a fried egg.  Serve with gravy on the side.
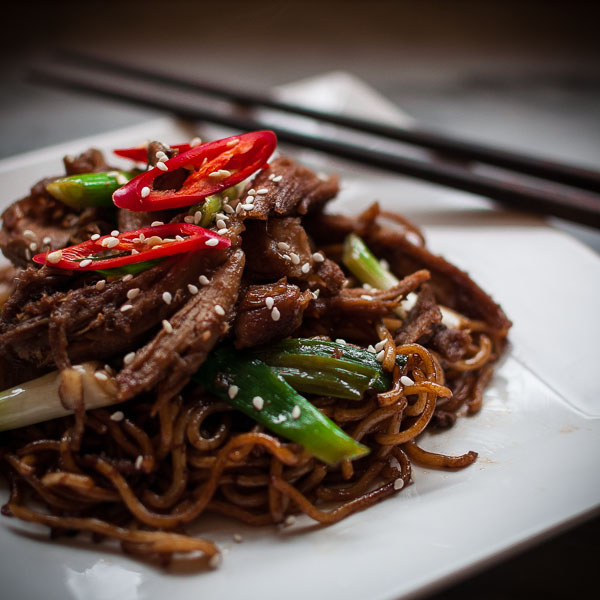

PULLED PORK NOODLES

ppnoodlesblog

Ingredients:

For the pulled pork noodles:

  • 500g pulled pork
  • 1 bunch of spring onions (about 10)
  • 3 cloves of garlic
  • 1 thumb sized piece of ginger
  • Half a red chilli
  • 5tbsp light soy sauce
  • 5tbsp dark soy sauce
  • 5tbsp orange juice (freshly squeezed if you’re fancy, or from a carton is fine)
  • 5tbsp maple syrup (or honey)
  • 2tbsp rice wine vinegar
  • 150g pre-cooked noodles (I used Udon)
  • 1tsp sesame seeds

Method:

Heat a little oil in a large frying pan or wok.  Finely chop the chilli, garlic and ginger (I used a grater for the ginger) and add to the oil.  Stir around for a few seconds to let the flavours infuse, but do not let the garlic burn!  Add the pulled pork and spring onions and cook for a few minutes until the pork starts to develop a bit of colour.

Mix the soy sauces, maple syrup and vinegar in a small bowl and gradually add to the pan, stirring all the ingredients so that everything gets coated and syrup.  Pop in your noodles and stir through for a minute or two (if the pan seems a but dry at this point just add a splash of water)

Serve immediately and sprinkle with sesame seeds,  Chopsticks and slurping is essential!


PULLED PORK BBQ BEANS

ppbbqbeansblog

Ingredients:

For the pulled pork bbq beans:

  • 500g pulled pork
  • 1 large onion
  • 2 cloves smoked garlic
  • 2 tins Heinz baked beans
  • 2tbsp maple syrup
  • 2tbsp cider vinegar
  • 1tbsp tomato puree
  • 1tbsp smoked paprika
  • 1tsp (heaped) hot chilli powder
  • Sour cream to serve

For the corn cakes

  • 2 large eggs
  • 60g plain flour
  • 60g semolina flour
  • 1/2tsp baking powder
  • 1tsp salt
  • 150g sweetcorn
  • 1 – 2tbsp milk
  • 1tbsp oil (and extra for cooking)

Method:

For the corn cakes:

Heat some oil in a large frying pan.  Mix all the ingredients together leaving the milk until last.  Add the milk a little at a time until you have a thick ‘dropping’ consistency.  Add heaped tablespoon-fulls of the batter to the pan and flatten gently with the back of the spoon.  Cook for a minute or two until small bubbles start to form on the top surface and the bottom has turned golden yellow.  Flip over and cook till golden on the other side.  You can leave the corn cakes on a plate in a low oven until ready to serve.

For the bbq beans:

Heat a generous drizzle of oil in a large frying pan.  Roughly chop the onion and add to the pan, stirring frequently until it becomes translucent.  Finely chop the garlic and add to the onions, cooking for another minute or two.  Pop in the paprika and chilli powder along with a little slurp of water and stir for a few minutes until the onions are all coated in the spice.

Add the remaining ingredients to the pan (apart from the sour cream) and cook on a medium heat for about 8 minutes until bubbly and thick.  Taste for seasoning (its not too late to add some more chilli powder at this point, a bit of heat really suits this dish).

Serve piled high in deep bowls with a stack of warm corn cakes on the side and a cooling dollop of sour cream on top.

Lemon loaf cake

 drizzleblog

One of the problems when you’re a prolific baker is when your work colleagues find out, and demand to be provided with baked treats on a weekly basis.  This lemon loaf cake is simple and delicious and ideal for transporting and portioning.

Ingredients:

For the cake:

  • 3 medium eggs (separated)
  • 1 cup caster sugar
  • 1 1/2 cups self-raising flour
  • 1/2 cup of yogurt
  • 1/2 cup of melted butter (left to cool to room temperature)
  • 1tsp baking powder
  • 1/2tsp bicarbonate of soda
  • zest of 1 lemon

For the icing:

  • Juice of 1 lemon
  • 100 – 150g icing sugar

Method:

For the cake:

Preheat your oven to 180c and grease and line a 900g loaf tin.

Beat the egg whites in an electric mixer with the whisk attachment until firm and dry.  In a separate bowl mix together the egg yolks, sugar, lemon, yogurt and butter.  Add the flour to the egg yolk mixture along with the baking powder and bicarbonate of soda and stir to combine.  Finally fold in the egg whites with a metal spoon until the mixture is uniform in colour.  Transfer the mix into the cake tin and bake for approx. 40mins until a skewer inserted into the centre of the cake comes out clean.  Remove the cake from the tin and leave on a wire rack to cool.

For the icing:

Put the lemon juice in a bowl and gradually whisk in the icing sugar until you have achieved a thick but pourable texture.  Drizzle generously and haphazardly over the cooled cake.  Leave until the icing has set and then cut into thick slices.  Feed to your grateful workmates for immediate brownie points (lemon cake points?).

drizzleblog2

Warm bulgur wheat salad with yogurt dressing

bugurblog

Despite what the British weather would lead you to believe, it is – in fact – summertime.  There is no better summer teatime treat than this fresh, herby, zesty salad recipe.

Ingredients:

For the salad:

  • 200g bulgur wheat
  • 100g green beans (trimmed)
  • 100g asparagus (woody ends chopped off)
  • 1 large courgette
  • A generous handful or two of fresh herbs (I used chives and parsley)
  • Zest of one lemon
  • Pinch of dried chilli flakes
  • 1tbsp butter
  • Salt and pepper to season

For the dressing:

  • 5tbsp full-fat yogurt (I used greek style)
  • Juice of half a lemon
  • 1tsp English mustard
  • 1tsp maple syrup
  • Salt and pepper to season

Method:

For the dressing:

Mix all the ingredients together in a bowl.  Cover and pop in the fridge to get nice and cold.

For the salad:

Preheat your oven to 180C

Put the bulgur wheat in a large bowl and cover with boiling water (so that there is about an inch of water above the level of the wheat).  Add a pinch of salt and stir together.  Cover and leave aside for about 15mins.  After this time the grains should have plumped up but still have a nutty bite.  Drain off any excess water and leave aside in a sieve or colander for the remaining liquid to evaporate.

Meanwhile, place the butter in a large frying pan set to a medium high heat.  Once the butter starts to sizzle, pop in the lemon zest and chilli flakes and stir together for a moment or two.  Add the drained bulgur wheat to the pan and stir together for a few minutes until the butter has been absorbed and the grains start to crackle and pop.  Transfer the bulgur wheat to a clean bowl.  Finely chop the herbs and mix in with the warm bulgur wheat.

Dice the vegetables into bite-sized pieces and place on a large baking tray.  Drizzle with olive oil and season generously with salt and pepper.  Pop in the oven for about 10 – 15 minutes until the vegetables are tender and then stir together with the bulgur wheat.

Serve warm with a drizzle of cold yogurt dressing.  I had my salad with some simple panfried chicken breast on the side.

bugurblog3