Totes Masc Pizza


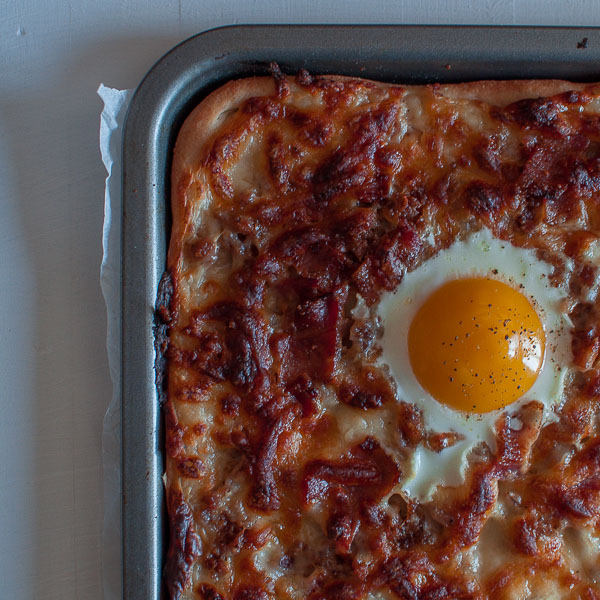
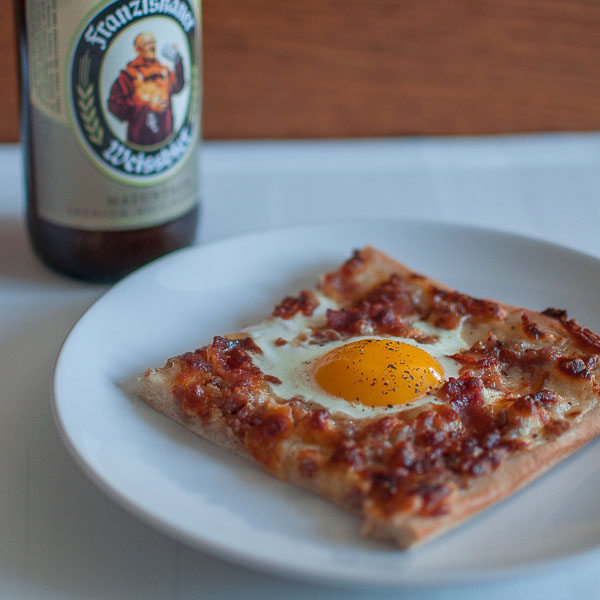
This pizza has beer in it, and two kinds of pork.  Eat it while building a bookshelf or watching the sportsball.

Ingredients:

Serves 2

  • 4g instant yeast
  • 75ml warm water
  • 1tbps olive oil
  • 125g bread flour
  • 1tsp table salt
  • 4 rashers smoked streaky bacon
  • 2 of your favourite sausages (skins removed)
  • 20g butter
  • 20g plain flour
  • 100ml of your favourite beer (though ideally a blonde or pale ale)
  • 100ml milk
  • 50g mature cheddar cheese (grated)
  • 50g of that pre-grated mozzarella
  • 2 eggs

Method:


For the pizza base:

Put the warm water in a bowl and add the yeast.  Stir until the yeast is dissolved and then add the olive oil.  Add the flour and salt and mix until roughly combined.  Empty onto a floured surface and knead until smooth (about 5 mins).  Put aside in a covered container until doubled in size (about 45 mins).

Pre-heat your oven to its highest temperature.

For the toppings:

Place the bacon in a lightly oiled (cold) pan and turn up the heat to medium.  Turn occasionally until golden and crispy and transfer to some kitchen paper to remove the excess fat.  Chop into rough pieces.

Add the sausage to the same pan and break up with the side of the spoon to form a mince-like texture.  Cook until golden and starting to crisp.  Put aside to cool.

For the beer-cheese sauce:

Put the butter and flour in a pan and cook on medium, stirring constantly to form a smooth golden paste.  Add the beer a little at a time whilst stirring and then add the milk.  Bubble away until thick and smooth and then reduce the heat to low.  Stir in the cheddar cheese and stir until melted.  Season to taste.

To finish:

Press the dough onto a lightly oiled baking tray to form a thin, even layer.  Spread on the beer-cheese sauce and sprinkle with the bacon and sausage bits.  Cover with the grated mozzarella.

Pop the pizza in the oven and keep and eye on it.  Once the sauce is bubbling and cheese is starting to turn golden remove the pizza from the oven.  Using the back of a spoon, make two little wells in the pizza toppings and break an egg into each.  Add a little pinch of salt and a grind of pepper to the yolk of each egg and return to the oven.  Your pizza is ready to go when the white is cooked and the yolk still has a bit of wobble.

Nacho chicken bites

nachochickenblog

I was in two minds about even posting this recipe – I mean, its chicken pieces coated in crushed up nachos, but man its just so frickin’ delicious that you really must try it.

Ingredients:

  • 200g bag of nachos (I used ‘cheese’ flavoured, but go for whatever tickles your fancy)
  • 50g seasoned flour (add salt/pepper to your liking)
  • 2 eggs (beaten)
  • 4 chicken breasts (cut into chunks of roughly equal size)
  • Sunflower or vegetable oil (the amount will depend on the size of your pan)

Method:

Half fill a large deep pan with oil and set on a medium high heat.

Crush the nachos into a rough crumbly mixture with both large and small pieces (I poured mine into a deep jug and bashed the hell out of them with the end of a rolling pin – top quality catharsis) .

Sprinkle the nachos onto a baking tray or large plate, the flour onto another and the beaten egg onto yet another.  Dip your chicken chunks into the flour until coated and then follow with the egg and finally the nacho dust.  Repeat until all chicken pieces are coated (you can ‘double-dip’ with more egg and nacho dust if you have some left over).

Your oil should be hot enough by now (I test mine by dipping in the end of a wooden spoon – you’re ready to fry if bubbles form around the handle).  Carefully add your coated chicken chunks to the pan using a slotted spoon (cook in batches so as not to overcrowd the pan) and let them sizzle away until crisp and golden.  Remove from the pan and drain on kitchen towel to remove any excess oil.

I served my chicken chunks on their own (with a sour cream dip) as well as in a tortilla wrap (or three) with salsa, lettuce and grated cheddar cheese.

nachochickenblog2


Very dark chocolate cookies with spiced chestnut buttercream

chestnutcookieblog

Imagine you’re curled on a sheepskin rug in  front of a roaring fire.  Imagine you’re snuggled in the arms of your significant other, both clad in chunky woollen jumpers.  Imagine a pot of spiced coffee bubbling away over the fire, the air rich with the scent of cinnamon and nutmeg.  Now imagine all of that in cookie form.  You’re welcome.

Ingredients:

For the cookies:

  • 125g dark chocolate
  • 150g plain flour
  • 30g cocoa
  • 1 tsp bicarbonate of soda
  • ½ tsp salt
  • 125g/4oz unsalted butter
  • 75g light brown sugar
  • 50g golden caster sugar
  • 1tsp finely ground coffee
  • 1 tsp vanilla extract
  • 1 free-range egg

For the chestnut buttercream:

  • 100g pre-cooked chestnuts
  • 100mls double cream
  • 50g unsalted butter
  • 150g icing sugar
  • 1/2 tsp ground cinnamon
  • 1/2 tsp ground nutmeg
  • 2 – 3 grinds of black pepper (trust me)

Method:

For the cookies:

Preheat your oven to 170C

Melt the chocolate in a pan set over barely simmering water, stirring occasionally.

Place the flour, salt, bicarbonate of soda, cocoa and coffee in a large bowl and mix together.

Cream the butter and sugars together in a separate bowl using an electric mixer on a high setting until pale and fluffy, then mix in the melted chocolate.

Stir in the vanilla extract and the egg, then stir in the dry ingredients until combined.

Divide into 12 equal portions (I used a small icecream scoop) and place on two lined baking trays.

Bake in the oven for 15 – 20 minutes until beautiful and cracked on the top but still slightly gooey.  Allow to cool on the tray for 5 minutes before transferring to a wire rack.

For the chestnut buttercream:

Place the chestnuts and cream in a small pan and heat on a medium heat until the chestnuts are soft and easy to mash with the back of a wooden spoon (about 10 minutes)

Pop the chestnuts and cream in an electric mixer and mix on high with the paddle attachment until smooth-ish (it will retain a ‘nutty’ texture).  Add in the butter and blend until incorporated before adding in the icing sugar (add the sugar in in two or three goes to prevent a sugar blizzard!).  Leave to blitz away for a few minutes until light and fluffy and finally add in the spices towards the end.

To finish:

Sandwich two cookies together with a generous dollop of chestnut cream.  Serve with a mug of strong coffee and eat whilst wearing a big woolly jumper.

This recipe was developed from lovely Nigella Lawson’s Intense Chocolate Cookies recipe.

chestnutcookieblog2

Cheesy pasta bake

pastabakeblog

Its normally around this time of year, with the days getting shorter and the weather getting cooler, that people start talking about craving ‘wholesome’ or ‘stodgy’ food – things like stews and bakes.  However, for me – and this may explain my, shall we say, well-upholstered physique – there is never a time of year that I’m not reaching for that packet of pasta or yearning for something stodgy and swimming in gravy.  This recipe is one of my speedy – and sooooo satisfying – staples, and one that’s delicious anytime of year.

Ingredients:

For the sauce:

  • 2tbsp butter (heaped)
  • 2tbsp flour (heaped)
  • 500ml milk (I used semi-skimmed)
  • 50g grated cheese of your choice (and a wee bit more for scattering over the top of your bake)
  • Salt and pepper

Other bits:

  • 250g dried pasta (I used rigatoni)
  • 1 ‘head’ of broccoli (or you could use cauliflower or a combination of both) – broken down into similarly sized florets

Method:

For the sauce:

Melt the butter in a medium hot pan until it starts to froth.  Add in the flour and stir into the melted butter to form a roux.  Keep stirring for a couple of minutes until the gloopy paste turns a shade darker and becomes golden.  Gradually add the milk and stir-stir-stir – the contents of the pan will turn super-thick and then thin out again.  Let this mixture bubble away for a few minutes until glossy and thickened, and VOILA – you have created a white sauce.

Remove from the heat and stir in the grated cheese (I used a wacky smoked Welsh goats cheese that was on offer in the supermarket) until it has melted away.  Return the pan to a low heat and cook for a few more minutes.  Taste and season to your liking.

Depending on how you are getting along with your pasta and veggies, you can either let the sauce blip away on a very low heat with an occasional stir, or remove from the heat and place a layer of clingfilm on top to prevent an icky skin from forming.

For the rest:

Preheat your oven to 180c

Fill a large pan with water and a generous amount of salt and bring to the boil.  Pop in your pasta and cook for 2 – 3 minutes less than the recommended cooking time.  When your pasta has about 3 minutes left to go (so about 5 minutes less than the cooking time on the packet – I hope you’re following?) add the broccoli to the pan.  After 3 minutes drain the pasta and veggies into a colander.

Mix the pasta, veggies and sauce in a large ovenproof dish or deep baking tray and scatter the top with more melted cheese.  Pop the bake in the oven and cook until the top has turned golden and crispy and the sauce is bubbling away at the sides (about 10 – 15 minutes depending on your oven).  I like to let my bake sit for a bit and cool slightly, to become a bit more solid and sticky, before serving.

pastabakeblog2

Pizza Buns

pizzatwistblog2

Pizza is my favourite.  My FAVOURITE.  If I had to choose my last meal, or if I could only ever eat one thing for the rest of my life, it would be pizza.  My desire to make my own pizza’s was the inspiration to begin baking bread at home and is the ideal place to start with homemade breads.  This recipe is super-fun and super-versatile.  I’m giving you the ‘basic’ sauce, but you can add whatever toppings tickle your fancy.

Ingredients:

For the pizza dough:

  • 200g bread flour
  • 50g semolina flour
  • 150ml warm water
  • 7g fast-acting yeast
  • 1tsp fine salt (heaped)
  • 1tsp sugar
  • 2tbsp olive oil

For the filling:

  • 500g carton of passata
  • 50g black olives
  • 1 small onion
  • 1 clove garlic
  • 1tbps tomato puree
  • 1tsp sugar
  • 1tsp dried oregano
  • 1tsp dried basil
  • 1tbsp olive oil

To finish:

  • 25g parmesan

Method:

For the sauce:

Heat the oil in a saucepan on medium high.  Veeeeeery finely chop the onion and garlic and add to the oil along with a pinch of salt.  Cook for a few minutes, stirring regularly until the garlic starts to brown.  Add in the rest of the ingredients (apart from the olives) and let the sauce blip away on a low heat until it is thick and rich.  Veeeeeery finely chop the olives and stir into the sauce.  Taste the sauce and adjust the seasoning to your liking.  Leave aside to cool.

For the pizza dough:

Put the water, sugar and yeast in a large bowl and stir together until the yeast has dissolved.  Add the flours, oil and salt to the bowl and stir together until combined into a sticky lump.  Transfer your dough to a clean floured board and knead for 10 – 15 minutes until smooth and elastic.  Return to the bowl and cover with clingfilm.  Place the bowl in a warm place until the dough has doubled in size .  Once the dough has risen turn it out onto a board or clean floured worktop and ‘knock back’ by giving it a good bash to force the air out.

Using your hands or a floured rolling pin roll the dough into a rough rectangle about 1/2cm thick.  Spread a thin layer of sauce over the dough (just like you would with a pizza) and grate over the parmesan cheese (its at this point that you can add your other fillings).  Now this is the messy bit – roll your dough up like a swiss roll, trying your best to create a tight spiral without all of your yummy sauce squishing out the sides.  Once rolled up, divide into 4cm thick portions and place – spiral up – on a lined backing sheet.

Cover with clingfilm and put aside for about 30 minutes to puff up once more.

While your waiting for your buns, preheat your oven to 180c.

Once the oven is hot, pop in your buns (make sure you remove the clingfilm) and bake for about 18 minutes until golden and crisp.

Eat straight from the oven with a side-salad (great if you want to convince yourself that you’re having a healthy dinner).  These buns are also great for snacking and for lunchboxes.

pizzatwistblog

Ginger, Lime and sesame cupcakes

sesamecupcakeblog2

So I had a little epiphany while watching The Great British Bakeoff.  When it comes to savoury cooking I’m quite adventurous with my use of flavours and techniques, but when it comes to sweets I tend to stick to the traditional – your chocolate, coffee and citrus.  Now while there is nothing wrong with the classics, I felt it was time to give my cupcakes a twist (oo-er) and try something new.  This recipe was inspired by the contents of my cupboards and being too lazy to go the the supermarket.

Ingredients:

For the sesame brittle:

  • 1/2 cup caster sugar
  • 1tbsp honey
  • 1/2 cup sesame seeds
  • Pinch of salt

For the cake:

  • 3 medium eggs (separated)
  • 1 cup caster sugar
  • 1 1/2 cups self-raising flour
  • 1/2 cup of sour cream
  • 1/2 cup of melted butter (left to cool to room temperature)
  • 1tsp baking powder
  • 1/2tsp bicarbonate of soda
  • 1 tsp ground ginger

For the sugar syrup:

  • 1/2 cup caster sugar
  • 1/2 cup lime juice (juice of 4 or 5 fresh limes)
  • 4 – 5 ‘disks’ of fresh ginger (you can leave the skin on)

For the icing:

  • 125g unsalted butter (at room temperature)
  • 250g icing sugar
  • 3 – 4tbsp sugar syrup

Method:

For the sesame brittle:

Put the sugar and honey in a pan and heat on medium high until the sugar has melted and turned golden and bubbly.  Be patient and resist the temptation to stir, you can ‘swirl’ the contents of the pan from time to time.  Stir in the sesame seeds and salt and pour immediately onto a baking sheet lined with greaseproof paper.  Leave aside to cool.  Once cooled, bash the brittle in a pestle and mortar to create a sugary, sesame crumble.

For the syrup:

Put all the ingredients in a pan and leave to bubble away on a medium high heat until reduced by half.  Leave aside to cool.

For the cake:

Preheat your oven to 180c.

Beat the egg whites in an electric mixer with the whisk attachment until firm and dry.  In a separate bowl mix together the egg yolks, sugar, lemon, yogurt and butter.  Add the flour to the egg yolk mixture along with the ginger, baking powder and bicarbonate of soda and stir to combine.  Finally fold in the egg whites with a metal spoon until the mixture is uniform in colour.  Transfer the mix into cupcake cases in a cupcake tray (about a tablespoon of batter per cupcake). Bake for about 12 mins until a skewer inserted into the centre of each cake comes out clean.  Remove the cakes from the tray and place on a wire rack.  While the cakes are still warm, drizzle on a tablespoon-full of lime and ginger syrup.

For the icing:

Put the butter in an electric mixer and beat on high speed using the blade attachment.  Once smooth, add in the icing sugar a bit at a time and continue to mix until the sugar is incorporated.  With the mixer still running add in the syrup and continue to mix for a few minutes.

To finish:

Sprinkle a layer of the crumbled brittle onto a plate or baking sheet.  Spoon a generous dollop of icing onto each cake.  Dip the cake into the sesame brittle so that the icing is all coated.

I served these exotic little beauties with a steaming cup of oolong tea (it seemed a fitting combination).

sesamecupcakeblog

Confetti Blends: Citrus Salt

citrussalt

As I continue on my journey to becoming a proper kick-ass cook, one of the things I’ve learned is the importance of seasoning.  I feel that, perhaps, its becoming a little bit untrendy to add salt to your food in recent years.  I’m not sure if this is a health thing or what – but I can say with great confidence that I am not jumping on board the no-salt train.  The no salt-train only leads to one destination, and that is Blandsville.

So – salt away my friends, don’t feel guilty for reaching for that little tub of sea salt.  Season at every stage of your dish and taste, taste, taste!

And what easier way of adding a bit of extra pizzazz to a dish than to sneak it in along with the salt, and what better way to bring us to the point of this blog – Citrus Salt.  I am an admitted fruit-o-phobe, my greatest nightmare is finding fruit in places it has no right to be – imagine my horror at discovering a raisin lurking in a curry dish, and don’t get me started with pineapple on pizza! But citrus fruits? Oh my. Manna of the gods.  Friend of of all creatures of the sea.

Ingredients:

  • 1 large orange
  • 2 plump lemons
  • 3 juicy little limes
  • 100g sea salt (I used Cornish Sea Salt)

Gadgets:

  • Spice grinder (I used my beloved Krups)

Method:

Remove the peel from your miscellaneous citrus beauties using a small, sharp paring knife.  Try to avoid the bitter white pith as much as possible and aim for long strands of peel.

Place your peelings on a large baking sheet and pop in a low oven (I went for about 80c) for an hour or two until everything has become stiff and dry, peak into the oven regularly to make sure nothing is burning.  Remove from the oven and leave on some clean kitchen paper for a day or two to complete dry out.

Whiz the peel in your spice grinder to form a fine golden powder.  Add a tablespoon or two of salt and whizz for a few more seconds.  Mix the ground salty peel with the remaining salt and voila!

Sprinkle liberally on seafood and veggies.

citrussaltblog42

Lemon loaf cake

 drizzleblog

One of the problems when you’re a prolific baker is when your work colleagues find out, and demand to be provided with baked treats on a weekly basis.  This lemon loaf cake is simple and delicious and ideal for transporting and portioning.

Ingredients:

For the cake:

  • 3 medium eggs (separated)
  • 1 cup caster sugar
  • 1 1/2 cups self-raising flour
  • 1/2 cup of yogurt
  • 1/2 cup of melted butter (left to cool to room temperature)
  • 1tsp baking powder
  • 1/2tsp bicarbonate of soda
  • zest of 1 lemon

For the icing:

  • Juice of 1 lemon
  • 100 – 150g icing sugar

Method:

For the cake:

Preheat your oven to 180c and grease and line a 900g loaf tin.

Beat the egg whites in an electric mixer with the whisk attachment until firm and dry.  In a separate bowl mix together the egg yolks, sugar, lemon, yogurt and butter.  Add the flour to the egg yolk mixture along with the baking powder and bicarbonate of soda and stir to combine.  Finally fold in the egg whites with a metal spoon until the mixture is uniform in colour.  Transfer the mix into the cake tin and bake for approx. 40mins until a skewer inserted into the centre of the cake comes out clean.  Remove the cake from the tin and leave on a wire rack to cool.

For the icing:

Put the lemon juice in a bowl and gradually whisk in the icing sugar until you have achieved a thick but pourable texture.  Drizzle generously and haphazardly over the cooled cake.  Leave until the icing has set and then cut into thick slices.  Feed to your grateful workmates for immediate brownie points (lemon cake points?).

drizzleblog2

Warm bulgur wheat salad with yogurt dressing

bugurblog

Despite what the British weather would lead you to believe, it is – in fact – summertime.  There is no better summer teatime treat than this fresh, herby, zesty salad recipe.

Ingredients:

For the salad:

  • 200g bulgur wheat
  • 100g green beans (trimmed)
  • 100g asparagus (woody ends chopped off)
  • 1 large courgette
  • A generous handful or two of fresh herbs (I used chives and parsley)
  • Zest of one lemon
  • Pinch of dried chilli flakes
  • 1tbsp butter
  • Salt and pepper to season

For the dressing:

  • 5tbsp full-fat yogurt (I used greek style)
  • Juice of half a lemon
  • 1tsp English mustard
  • 1tsp maple syrup
  • Salt and pepper to season

Method:

For the dressing:

Mix all the ingredients together in a bowl.  Cover and pop in the fridge to get nice and cold.

For the salad:

Preheat your oven to 180C

Put the bulgur wheat in a large bowl and cover with boiling water (so that there is about an inch of water above the level of the wheat).  Add a pinch of salt and stir together.  Cover and leave aside for about 15mins.  After this time the grains should have plumped up but still have a nutty bite.  Drain off any excess water and leave aside in a sieve or colander for the remaining liquid to evaporate.

Meanwhile, place the butter in a large frying pan set to a medium high heat.  Once the butter starts to sizzle, pop in the lemon zest and chilli flakes and stir together for a moment or two.  Add the drained bulgur wheat to the pan and stir together for a few minutes until the butter has been absorbed and the grains start to crackle and pop.  Transfer the bulgur wheat to a clean bowl.  Finely chop the herbs and mix in with the warm bulgur wheat.

Dice the vegetables into bite-sized pieces and place on a large baking tray.  Drizzle with olive oil and season generously with salt and pepper.  Pop in the oven for about 10 – 15 minutes until the vegetables are tender and then stir together with the bulgur wheat.

Serve warm with a drizzle of cold yogurt dressing.  I had my salad with some simple panfried chicken breast on the side.

bugurblog3