Broccoli Cheddar Soup

brocsoupblog

I honestly can’t remember when I stopped eating vegetables because they were ‘healthy’ and started eating them because they’re fricking delicious (well, most of them anyway.  Sprouts can do one frankly).  This soup is packed with broccoli, and I’m sure that it has loads of health benefits yadda yadda, but mostly its just totally yum.  Try it.

Ingredients:

Serves 2

  • Two ‘heads’ of broccoli (about 500g)
  • 1 small onion
  • 2 Tbsp olive oil
  • 1 Tbsp butter
  • 2 stock cubes (vegetable or chicken)
  • 100g mature cheddar cheese (grated)
  • 4 Tbsp double cream (optional)
  • Salt and pepper

Method:

Heat the oil and butter in a large, deep saucepan until the butter starts to foam.  Dice the onion (don’t worry about being too neat, its going to get blended anyway) and add to the pan.  Cook the onion until translucent – 2 to 3 minutes.

Chop up the broccoli and dispose of the hard central stem.  Add to the pan and stir through with the butter and onion for a couple of minutes.  Add enough water to the pan so that it comes up to about half the level of the broccoli.  Turn the heat down low and cover the pan with a lid or foil.  Cook for about 10 minutes until the broccoli is streamed and tender.

Blend the contents of the pan (use a stick blender or transfer to a standing one) until smooth.  Return to the pan on a low heat.  Crumble in the stock cubes and add enough water until you’ve achieved your optimum soup consistency (I like mine thiiiiiiick).  Stir in the cheese and cook for a few minutes until it has melted in.  Add the cream and stir.  Do a quick taste test and season to your liking.  Serve immediately with shed-loads of crusty bread – see if you can eat an entire bowl without needing a spoon.


Mushroom Risotto

mushroomrisottoblog2

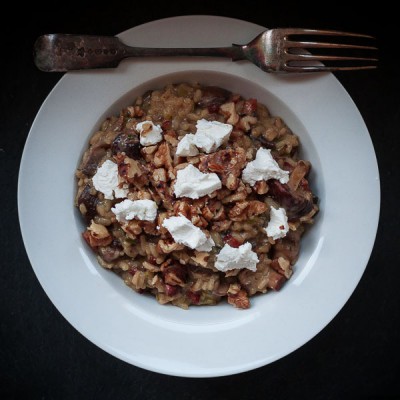
Splash and stir, splash and stir, splash and stir.  Yes, risotto is an exercise in patience (or tedium), and yes, there comes a point about halfway through the cooking time when you wonder if its all worth it, but when you jam that first creamy, satisfying spoonful into your gob, you realise that your time has truly been well spent.  Also, this recipe has nuts, goats cheese and an ungodly amount of butter in it – how could you not??

Ingredients:

Serves 2

  • 150g risotto rice
  • 450ml light chicken or veg stock
  • 400g mushrooms (I used a mix of chestnut mushrooms and oyster mushrooms)
  • 1 generous pinch of dried porcini mushrooms (not essential, but adds a mega-burst of woodsy mushroom flavour)
  • 1 onions(peeled and very finely diced)
  • 1 clove garlic (peeled and finely chopped)
  • 75g walnut halves
  • 50g goats cheese
  • 50g parmesan cheese (finely grated)
  • A lot of butter (best to have a whole pack ready)


Method:

Put the stock in a saucepan on a medium heat to keep it warm.

Put the dried mushrooms into a small bowl and cover with boiling water from the kettle.

Toast the walnut halves in a hot dry pan until they start to darken and the room fills with the scent of toasted nuts.  Leave aside to cool.

Add a generous knob of butter (mushrooms love butter – I mean seriously, like Britney loved Justin) and a tablespoon of olive oil to the pan and quickly stir in the garlic.  Before the garlic starts to darken ‘crumble’ in the mushrooms (simply break them up using your fingers – much quicker than chopping and gives you risotto a nice rustic look) and stir frequently.  It will look like an awful lot of mushrooms, but they will reduce as they cook.  Add a pinch of salt and pepper and cook until the mushrooms release their liquid and the pan becomes dry again.  Transfer the mushrooms to a bowl and leave aside until later.

Remove the dried mushrooms (well actually, rehydrated mushrooms) from the liquid, finely dice and chuck in with the other mushrooms.  Don’t throw away the mushroom water, pop this in the pan with the rest of the stock.

Add another tablespoon of oil to the pan and fry the onion until translucent.  Stir in the rice until all of the grains are coated in oil.  Ladle a spoonful of stock into the pan (you can always start by adding a glass of white wine if you’ve got one knocking about) and stir constantly until the liquid is incorporated.  This is the boring bit – keep adding stock and stirring until it is absorbed by the rice.

Once you’ve used about 3 quarters of the stock try tasting a few grains of your rice.  There is a lot of debate about the ideal consistency of risotto, classically I think you’re meant to aim of a bit if ‘bite’ to the grains, however, I prefer mine a bit more on the soft and creamy side.  If you’re like me you won’t be able to tell by eye, so just try a few grains between each additional spoonful of stock until you get to a consistency that you like (you may not need all the stock, or you may need another splash of hot water from the kettle).  Taste and adjust the seasoning if necessary – you probably won’t need any salt (the parmesan will add that) but you will probably like a few grinds of coarse black pepper.

Stir in the mushrooms until warmed through then add in the parmesan and another knob of butter.  Remove from the heat, cover  and leave for a minute or two to get all sexy and unctuous.  You can roughly chop your nuts while you wait – oo-er.

Give the risotto a final stir before heaping into big bowls.  Sprinkle with the toasted nuts and crumble over some goats cheese.  Serve immediately with a glass of wine or a nice bottle of lager.

mushroomrisottoblog


Cheesy pasta bake

pastabakeblog

Its normally around this time of year, with the days getting shorter and the weather getting cooler, that people start talking about craving ‘wholesome’ or ‘stodgy’ food – things like stews and bakes.  However, for me – and this may explain my, shall we say, well-upholstered physique – there is never a time of year that I’m not reaching for that packet of pasta or yearning for something stodgy and swimming in gravy.  This recipe is one of my speedy – and sooooo satisfying – staples, and one that’s delicious anytime of year.

Ingredients:

For the sauce:

  • 2tbsp butter (heaped)
  • 2tbsp flour (heaped)
  • 500ml milk (I used semi-skimmed)
  • 50g grated cheese of your choice (and a wee bit more for scattering over the top of your bake)
  • Salt and pepper

Other bits:

  • 250g dried pasta (I used rigatoni)
  • 1 ‘head’ of broccoli (or you could use cauliflower or a combination of both) – broken down into similarly sized florets

Method:

For the sauce:

Melt the butter in a medium hot pan until it starts to froth.  Add in the flour and stir into the melted butter to form a roux.  Keep stirring for a couple of minutes until the gloopy paste turns a shade darker and becomes golden.  Gradually add the milk and stir-stir-stir – the contents of the pan will turn super-thick and then thin out again.  Let this mixture bubble away for a few minutes until glossy and thickened, and VOILA – you have created a white sauce.

Remove from the heat and stir in the grated cheese (I used a wacky smoked Welsh goats cheese that was on offer in the supermarket) until it has melted away.  Return the pan to a low heat and cook for a few more minutes.  Taste and season to your liking.

Depending on how you are getting along with your pasta and veggies, you can either let the sauce blip away on a very low heat with an occasional stir, or remove from the heat and place a layer of clingfilm on top to prevent an icky skin from forming.

For the rest:

Preheat your oven to 180c

Fill a large pan with water and a generous amount of salt and bring to the boil.  Pop in your pasta and cook for 2 – 3 minutes less than the recommended cooking time.  When your pasta has about 3 minutes left to go (so about 5 minutes less than the cooking time on the packet – I hope you’re following?) add the broccoli to the pan.  After 3 minutes drain the pasta and veggies into a colander.

Mix the pasta, veggies and sauce in a large ovenproof dish or deep baking tray and scatter the top with more melted cheese.  Pop the bake in the oven and cook until the top has turned golden and crispy and the sauce is bubbling away at the sides (about 10 – 15 minutes depending on your oven).  I like to let my bake sit for a bit and cool slightly, to become a bit more solid and sticky, before serving.

pastabakeblog2

Pizza Buns

pizzatwistblog2

Pizza is my favourite.  My FAVOURITE.  If I had to choose my last meal, or if I could only ever eat one thing for the rest of my life, it would be pizza.  My desire to make my own pizza’s was the inspiration to begin baking bread at home and is the ideal place to start with homemade breads.  This recipe is super-fun and super-versatile.  I’m giving you the ‘basic’ sauce, but you can add whatever toppings tickle your fancy.

Ingredients:

For the pizza dough:

  • 200g bread flour
  • 50g semolina flour
  • 150ml warm water
  • 7g fast-acting yeast
  • 1tsp fine salt (heaped)
  • 1tsp sugar
  • 2tbsp olive oil

For the filling:

  • 500g carton of passata
  • 50g black olives
  • 1 small onion
  • 1 clove garlic
  • 1tbps tomato puree
  • 1tsp sugar
  • 1tsp dried oregano
  • 1tsp dried basil
  • 1tbsp olive oil

To finish:

  • 25g parmesan

Method:

For the sauce:

Heat the oil in a saucepan on medium high.  Veeeeeery finely chop the onion and garlic and add to the oil along with a pinch of salt.  Cook for a few minutes, stirring regularly until the garlic starts to brown.  Add in the rest of the ingredients (apart from the olives) and let the sauce blip away on a low heat until it is thick and rich.  Veeeeeery finely chop the olives and stir into the sauce.  Taste the sauce and adjust the seasoning to your liking.  Leave aside to cool.

For the pizza dough:

Put the water, sugar and yeast in a large bowl and stir together until the yeast has dissolved.  Add the flours, oil and salt to the bowl and stir together until combined into a sticky lump.  Transfer your dough to a clean floured board and knead for 10 – 15 minutes until smooth and elastic.  Return to the bowl and cover with clingfilm.  Place the bowl in a warm place until the dough has doubled in size .  Once the dough has risen turn it out onto a board or clean floured worktop and ‘knock back’ by giving it a good bash to force the air out.

Using your hands or a floured rolling pin roll the dough into a rough rectangle about 1/2cm thick.  Spread a thin layer of sauce over the dough (just like you would with a pizza) and grate over the parmesan cheese (its at this point that you can add your other fillings).  Now this is the messy bit – roll your dough up like a swiss roll, trying your best to create a tight spiral without all of your yummy sauce squishing out the sides.  Once rolled up, divide into 4cm thick portions and place – spiral up – on a lined backing sheet.

Cover with clingfilm and put aside for about 30 minutes to puff up once more.

While your waiting for your buns, preheat your oven to 180c.

Once the oven is hot, pop in your buns (make sure you remove the clingfilm) and bake for about 18 minutes until golden and crisp.

Eat straight from the oven with a side-salad (great if you want to convince yourself that you’re having a healthy dinner).  These buns are also great for snacking and for lunchboxes.

pizzatwistblog

Warm bulgur wheat salad with yogurt dressing

bugurblog

Despite what the British weather would lead you to believe, it is – in fact – summertime.  There is no better summer teatime treat than this fresh, herby, zesty salad recipe.

Ingredients:

For the salad:

  • 200g bulgur wheat
  • 100g green beans (trimmed)
  • 100g asparagus (woody ends chopped off)
  • 1 large courgette
  • A generous handful or two of fresh herbs (I used chives and parsley)
  • Zest of one lemon
  • Pinch of dried chilli flakes
  • 1tbsp butter
  • Salt and pepper to season

For the dressing:

  • 5tbsp full-fat yogurt (I used greek style)
  • Juice of half a lemon
  • 1tsp English mustard
  • 1tsp maple syrup
  • Salt and pepper to season

Method:

For the dressing:

Mix all the ingredients together in a bowl.  Cover and pop in the fridge to get nice and cold.

For the salad:

Preheat your oven to 180C

Put the bulgur wheat in a large bowl and cover with boiling water (so that there is about an inch of water above the level of the wheat).  Add a pinch of salt and stir together.  Cover and leave aside for about 15mins.  After this time the grains should have plumped up but still have a nutty bite.  Drain off any excess water and leave aside in a sieve or colander for the remaining liquid to evaporate.

Meanwhile, place the butter in a large frying pan set to a medium high heat.  Once the butter starts to sizzle, pop in the lemon zest and chilli flakes and stir together for a moment or two.  Add the drained bulgur wheat to the pan and stir together for a few minutes until the butter has been absorbed and the grains start to crackle and pop.  Transfer the bulgur wheat to a clean bowl.  Finely chop the herbs and mix in with the warm bulgur wheat.

Dice the vegetables into bite-sized pieces and place on a large baking tray.  Drizzle with olive oil and season generously with salt and pepper.  Pop in the oven for about 10 – 15 minutes until the vegetables are tender and then stir together with the bulgur wheat.

Serve warm with a drizzle of cold yogurt dressing.  I had my salad with some simple panfried chicken breast on the side.

bugurblog3

Butternut squash soup and saffron knots

buttsoupblog

Being a lazy shopper (and just generally lazy) I like to keep my visits to the supermarket to a minimum.  As such its always a good idea to buy versatile ingredients that can be used in different ways to create unique dishes.  This recipe has a lot of the components from my Squash and chickpea curry but presented in a delicious and different way.

Ingredients:

For the soup:

  • 1 butternut squash
  • 1 large onion
  • 2 cloves garlic (peeled and squished flat with the side of a knife)
  • 1tsp (heaped) curry powder (blend of your choice)
  • 1/2 can coconut milk
  • 2tbsp fish sauce
  • Salt and pepper to taste

For the coriander oil:

  • Handful of fresh coriander (leaves, stalks and all)
  • Olive oil
  • Pinch of salt

For the saffron knots (makes about 6 rolls):

  •  Pinch of saffron
  • 7g fast action yeast
  • 225mls hot water
  • 100g semolina flour
  • 275g bread flour
  • 1tbsp olive oil
  • 1tsp salt
  • 1 egg yolk

Method:

For the saffron knots;

Place the saffron in the hot water and put aside to steep until the water has come down to room temperature (or luke warm) and has become golden yellow. Strain through a sieve and discard the saffron strands. Add the remaining ingredients (apart from the egg yolk) and mix together in a large bowl until it all comes together in a sticky mass.

Tip your dough onto a clean floured surface (or into an electric mixer) and kneed until smooth and elastic (about 8  – 10 minutes).  Transfer the dough to an oiled, covered container and leave until risen to twice its original volume.

Once the dough has risen ‘knock it back’ by flattening it down with your hands or by folding it in on itself.  Divide your dough into roughly 100g portions and roll each piece into a thin sausage shape (about 8′ long) and simply tie into a knot shape.  Place your knots onto a floured baking tray.  Cover with clingfilm and leave aside for 30mins to plump up and meanwhile set your oven to preheat on full.

After 30mins brush your knots with a little egg yolk (lightly beaten with a splash of water) and pop in the oven.  After 5 mins reduce the oven temp to 180C and cook for a further 10mins.  Remove the knots from the oven and leave to cool on a wire rack.

For the coriander oil:

Place the coriander and salt in a blender and blend at high speed while drizzling in the olive oil.  Keep adding the oil until you have a smooth, pour-able consistency.

For the soup:

Preheat your oven to 180C

Peel and chop the butternut squash into small cubes and dice the onion into large chunks.  Place together on a large baking tray along the the garlic.  Drizzle with oil, season generously with salt and pepper and sprinkle over the curry powder.  Mix everything together so that all the ingredients are coated in the spices.

Pop in the oven for about 20mins (removing from the oven occasionally to stir everything around) until the squash has softened and started to catch on the edges.  The onion will have become quite dark and crisped at the ends by this point, but do not worry, this adds to the flavor.

Transfer your cooked squash, onion and garlic to the blender (ideally the same one you made the coriander oil in and left unwashed) and blitz on high along with the coconut milk and fish sauce.  Blitz until smooth and add in water a little at a time until you achieve your preferred consistency (some people like a very thick soup, others a bit more runny) and season to taste.

Portion up into clean white bowls and drizzle with a little coriander oil.  Serve piping hot with a couple of warm saffron knots on the side for dipping.

knotblog

Squash and chickpea curry

bncurryblog2

I am very much the carnivore (and find that I’m becoming increasingly more carnivorous as I get older), but sometimes you can’t beat a delicious vegetarian meal.  This is one of my favorite go-to vegetarian recipes.  The squash and chickpeas lend this dish a bit of heft and leaves you so satisfied that you won’t even notice that you’ve gone veggie for dinner!

Ingredients:

  • 1 small butternut squash (or half a large one) peeled and cut into small cubes
  • 1 courgette (chopped into chunks around the same size as your squash cubes)
  • 1 large onion (roughly chopped)
  • 2 cloves garlic (peeled and squished flat with the side of a knife)
  • 1 thumb-sized piece of ginger (peeled and roughly sliced)
  • 2tbsp curry powder (blend of your choice – I used my own tikka mix)
  • 1tbsp white wine vinegar (or cider vinegar)
  • 1tbsp maple syrup
  • 2tbsp fish sauce
  • 1 tin coconut milk
  • 1 tin chickpeas
  • 1 bag of pre-washed baby spinach
  • Handful of fresh coriander (finely chopped)

To serve:

  • Basmati rice (enough to serve two)

Method:

Scatter the squash cubes on large baking tray, drizzle with oil and season generously.  Place in a medium-high oven for about 10mins until the cubes start to colour at the edges and then stir in the courgette.  Cook for another 10mins until the vegetables are softened and have gained a bit of colour.  Put aside until later and get your rice cooking according to the packet instructions.

Heat a tablespoon or two of oil in a large frying pan and fry the onion, garlic and ginger until the onion starts to turn golden at the edges.  Sprinkle in the curry powder along with a splash of water to prevent the spices from burning.  Stir for a minute or two until everything is coated and golden and then transfer the contents of the pan to a blender.  Blend on high speed and add in just enough coconut milk to form a thick paste.

Return the paste to the pan along with the vinegar, fish sauce and maple syrup.  Once the paste is bubbling, add in your squash and courgette pieces along with the (drained) tin of chickpeas.  Add more coconut milk to the pan (you may not need all of it depending on how ‘saucy’ you want your curry – or you may need to add additional water if the curry seems too dry).  When your sauce is bubbling away happily, stir in the spinach and coriander and cook for a few minutes until the spinach has wilted.  Now is the time to taste your sauce and add salt and/or pepper to your liking.  

Serve immediately with boiled white rice and perhaps a naan bread (or two).

bncurryblog3

Steamed mushroom buns and greens in miso butter

dumplr3

Ingredients:

For the dough:

  • 2/3 cup warm water
  • 2tsp instant yeast
  • 2tbsp sugar
  • 1tbsp sunflower or vegetable oil
  • 1 + 1/4 cup bread flour
  • 1tsp salt
  • 1/4tsp baking powder

For the mushroom filling:

  • 250g mushrooms (I used a mixture of chestnut and shitake)
  • 5 spring onions
  • 1 clove garlic
  • 2tbsp oil
  • 2tbsp soy sauce
  • 1tbsp maple syrup (or honey)
  • 1tbsp oyster sauce
  • 1tsp chinese five spice
  • 1/2tsp ground szechuan pepper

For the greens:

  • 1tbsp butter
  • 1tsp miso paste
  • Greens of your choice (I used a mixture of spring greens and baby bak choi)

For the dipping sauce:

  • 4tbsp soy sauce
  • 2tbsp maple syrup (or honey)
  • 2tbsp rice wine vinegar
  • 1tsp chilli oil (or more if you like it spice)
  • 1tsp sesame oil

Method:

For the dough:

Mix the water, sugar, and yeast in a bowl until the yeast has dissolved.  Add the oil and then stir in the flour and salt.  Once the dough comes together in a sticky lump, transfer onto a floured surface and knead until smooth (about 5 to 10 minutes).  Put the dough aside in an oiled, covered bowl until risen to double its size.

For the mushroom filling:

Heat the oil in a large pan on a medium high heat.  Finely chop the garlic and spring onion and cook until the garlic has started to turn golden.  Add the mushrooms and cook until reduced in size and the pan starts to look dry (about 10 minutes).  Add the remaining ingredients and cook for a few more minutes until rich and dark brown.  Transfer to a clean bowl and allow to cool.

For the dumplings:

Punch down the risen dough and separate into small walnut sized balls (you should have about 8 – 10).  Press each ball into a flat circle (about 4inches across) and pop a heaped teaspoon of the cooled mushroom mixture into the centre. Lift the edges of the dough to enclose the filling and pinch and twist the dough to seal.

Place each dumpling on a small square of parchment paper and leave aside for about 20 minutes under a damp cloth. Meanwhile, heat some water in a pan until simmering.  Load the dumplings into a bamboo steamer (or more than one stacked on top of each other) keeping them on the parchment paper pieces.  Leave to steam over the bubbling pan for 10-12 minutes.

For the greens:

Melt the butter in a medium hot pan until it starts to froth and bubble.  Add in the miso and whisk until it has incorporated with the butter.  Toss in your greens and allow to cook until just tender.  Depending on your miso you may need to add a bit of extra seasoning at this point.

For the dipping sauce:

Mix all ingredients in a bowl. Easy!

Serve the dumplings straight from the steamer with a little bowl of dipping sauce on the side.  Best enjoyed with an ice cold bottle of Tiger beer.

dumplr2