Warm bulgur wheat salad with yogurt dressing

bugurblog

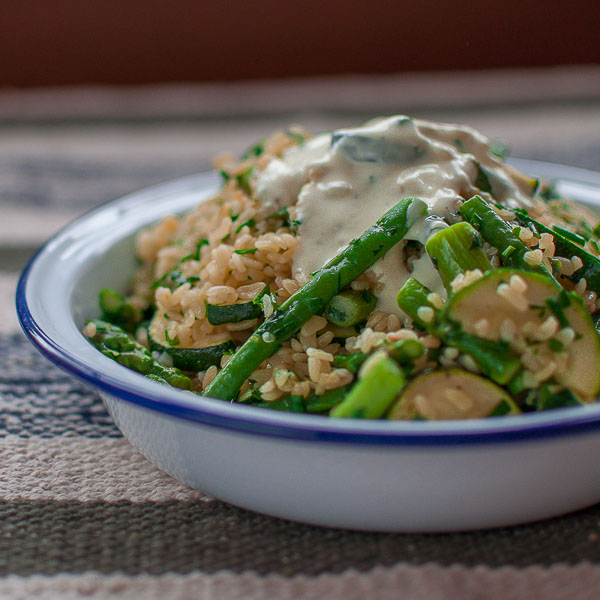
Despite what the British weather would lead you to believe, it is – in fact – summertime.  There is no better summer teatime treat than this fresh, herby, zesty salad recipe.

Ingredients:

For the salad:

  • 200g bulgur wheat
  • 100g green beans (trimmed)
  • 100g asparagus (woody ends chopped off)
  • 1 large courgette
  • A generous handful or two of fresh herbs (I used chives and parsley)
  • Zest of one lemon
  • Pinch of dried chilli flakes
  • 1tbsp butter
  • Salt and pepper to season

For the dressing:

  • 5tbsp full-fat yogurt (I used greek style)
  • Juice of half a lemon
  • 1tsp English mustard
  • 1tsp maple syrup
  • Salt and pepper to season

Method:

For the dressing:

Mix all the ingredients together in a bowl.  Cover and pop in the fridge to get nice and cold.

For the salad:

Preheat your oven to 180C

Put the bulgur wheat in a large bowl and cover with boiling water (so that there is about an inch of water above the level of the wheat).  Add a pinch of salt and stir together.  Cover and leave aside for about 15mins.  After this time the grains should have plumped up but still have a nutty bite.  Drain off any excess water and leave aside in a sieve or colander for the remaining liquid to evaporate.

Meanwhile, place the butter in a large frying pan set to a medium high heat.  Once the butter starts to sizzle, pop in the lemon zest and chilli flakes and stir together for a moment or two.  Add the drained bulgur wheat to the pan and stir together for a few minutes until the butter has been absorbed and the grains start to crackle and pop.  Transfer the bulgur wheat to a clean bowl.  Finely chop the herbs and mix in with the warm bulgur wheat.

Dice the vegetables into bite-sized pieces and place on a large baking tray.  Drizzle with olive oil and season generously with salt and pepper.  Pop in the oven for about 10 – 15 minutes until the vegetables are tender and then stir together with the bulgur wheat.

Serve warm with a drizzle of cold yogurt dressing.  I had my salad with some simple panfried chicken breast on the side.

bugurblog3

Butternut squash soup and saffron knots

buttsoupblog

Being a lazy shopper (and just generally lazy) I like to keep my visits to the supermarket to a minimum.  As such its always a good idea to buy versatile ingredients that can be used in different ways to create unique dishes.  This recipe has a lot of the components from my Squash and chickpea curry but presented in a delicious and different way.

Ingredients:

For the soup:

  • 1 butternut squash
  • 1 large onion
  • 2 cloves garlic (peeled and squished flat with the side of a knife)
  • 1tsp (heaped) curry powder (blend of your choice)
  • 1/2 can coconut milk
  • 2tbsp fish sauce
  • Salt and pepper to taste

For the coriander oil:

  • Handful of fresh coriander (leaves, stalks and all)
  • Olive oil
  • Pinch of salt

For the saffron knots (makes about 6 rolls):

  •  Pinch of saffron
  • 7g fast action yeast
  • 225mls hot water
  • 100g semolina flour
  • 275g bread flour
  • 1tbsp olive oil
  • 1tsp salt
  • 1 egg yolk

Method:

For the saffron knots;

Place the saffron in the hot water and put aside to steep until the water has come down to room temperature (or luke warm) and has become golden yellow. Strain through a sieve and discard the saffron strands. Add the remaining ingredients (apart from the egg yolk) and mix together in a large bowl until it all comes together in a sticky mass.

Tip your dough onto a clean floured surface (or into an electric mixer) and kneed until smooth and elastic (about 8  – 10 minutes).  Transfer the dough to an oiled, covered container and leave until risen to twice its original volume.

Once the dough has risen ‘knock it back’ by flattening it down with your hands or by folding it in on itself.  Divide your dough into roughly 100g portions and roll each piece into a thin sausage shape (about 8′ long) and simply tie into a knot shape.  Place your knots onto a floured baking tray.  Cover with clingfilm and leave aside for 30mins to plump up and meanwhile set your oven to preheat on full.

After 30mins brush your knots with a little egg yolk (lightly beaten with a splash of water) and pop in the oven.  After 5 mins reduce the oven temp to 180C and cook for a further 10mins.  Remove the knots from the oven and leave to cool on a wire rack.

For the coriander oil:

Place the coriander and salt in a blender and blend at high speed while drizzling in the olive oil.  Keep adding the oil until you have a smooth, pour-able consistency.

For the soup:

Preheat your oven to 180C

Peel and chop the butternut squash into small cubes and dice the onion into large chunks.  Place together on a large baking tray along the the garlic.  Drizzle with oil, season generously with salt and pepper and sprinkle over the curry powder.  Mix everything together so that all the ingredients are coated in the spices.

Pop in the oven for about 20mins (removing from the oven occasionally to stir everything around) until the squash has softened and started to catch on the edges.  The onion will have become quite dark and crisped at the ends by this point, but do not worry, this adds to the flavor.

Transfer your cooked squash, onion and garlic to the blender (ideally the same one you made the coriander oil in and left unwashed) and blitz on high along with the coconut milk and fish sauce.  Blitz until smooth and add in water a little at a time until you achieve your preferred consistency (some people like a very thick soup, others a bit more runny) and season to taste.

Portion up into clean white bowls and drizzle with a little coriander oil.  Serve piping hot with a couple of warm saffron knots on the side for dipping.

knotblog

Squash and chickpea curry

bncurryblog2

I am very much the carnivore (and find that I’m becoming increasingly more carnivorous as I get older), but sometimes you can’t beat a delicious vegetarian meal.  This is one of my favorite go-to vegetarian recipes.  The squash and chickpeas lend this dish a bit of heft and leaves you so satisfied that you won’t even notice that you’ve gone veggie for dinner!

Ingredients:

  • 1 small butternut squash (or half a large one) peeled and cut into small cubes
  • 1 courgette (chopped into chunks around the same size as your squash cubes)
  • 1 large onion (roughly chopped)
  • 2 cloves garlic (peeled and squished flat with the side of a knife)
  • 1 thumb-sized piece of ginger (peeled and roughly sliced)
  • 2tbsp curry powder (blend of your choice – I used my own tikka mix)
  • 1tbsp white wine vinegar (or cider vinegar)
  • 1tbsp maple syrup
  • 2tbsp fish sauce
  • 1 tin coconut milk
  • 1 tin chickpeas
  • 1 bag of pre-washed baby spinach
  • Handful of fresh coriander (finely chopped)

To serve:

  • Basmati rice (enough to serve two)

Method:

Scatter the squash cubes on large baking tray, drizzle with oil and season generously.  Place in a medium-high oven for about 10mins until the cubes start to colour at the edges and then stir in the courgette.  Cook for another 10mins until the vegetables are softened and have gained a bit of colour.  Put aside until later and get your rice cooking according to the packet instructions.

Heat a tablespoon or two of oil in a large frying pan and fry the onion, garlic and ginger until the onion starts to turn golden at the edges.  Sprinkle in the curry powder along with a splash of water to prevent the spices from burning.  Stir for a minute or two until everything is coated and golden and then transfer the contents of the pan to a blender.  Blend on high speed and add in just enough coconut milk to form a thick paste.

Return the paste to the pan along with the vinegar, fish sauce and maple syrup.  Once the paste is bubbling, add in your squash and courgette pieces along with the (drained) tin of chickpeas.  Add more coconut milk to the pan (you may not need all of it depending on how ‘saucy’ you want your curry – or you may need to add additional water if the curry seems too dry).  When your sauce is bubbling away happily, stir in the spinach and coriander and cook for a few minutes until the spinach has wilted.  Now is the time to taste your sauce and add salt and/or pepper to your liking.  

Serve immediately with boiled white rice and perhaps a naan bread (or two).

bncurryblog3

BMT Spaghetti (Bacon, mackerel, tomato)

bmtblog2

I don’t know about you, but my shopping can be a little . . . chaotic.  Most of the time I go to the supermarket with no idea what I’m going to buy, or what meals I’m going to make in the week.  I tend to grab items at random, and hope that it all comes together into something delicious when I get to the kitchen.  This recipe is the product of one such shopping trip.

Ingredients:

  • 200g spaghetti (I used wholewheat)
  • Packet of cherry tomatoes (about 300g)
  • 4 rashers bacon (I used smoked streaky)
  • Pinch of chilli flakes
  • Juice of one lemon
  • 1tbsp butter (or my citrus and herb compound butter)
  • 4 pre-cooked mackerel fillets
  • Parmesan cheese to finish

Method:

Set your pasta cooking by following the instructions on the packet.

Chop the bacon into fine strips (I use scissors for this) and fry in a large frying pan, adding a little bit of oil if you need to.  Once the bacon starts to turn golden around the edges, halve the tomatoes and add them to the pan.  Fry on a medium-high heat until the tomatoes have released their juices and the pan looks dry.

Add the chilli, butter and lemon juice and continue to cook until the lemon juice has sizzled away.  Remove the skin from the mackerel fillets and flake them into the pan.  Stir everything gently together, trying not to break up the pieces of mackerel. Drain your pasta and add to the pan, stirring together with the sauce for a minute until everything is well coated.

Serve with a generous grating of parmesan cheese.

bmtblog

Mince and gravy with herby, cheesy dumplings

minceblog3

Here the mince and gravy (though delicious) play second fiddle to the moist, cheesy, herby dumplings.  This recipe also features the first appearance of my patented (not really) ‘oomph’ that I love to add to all sorts of soups, sauces and stews.

Ingredients:

For the mince and gravy:

  • 750g beef and pork mince (or just beef if you prefer)
  • 1 large onion
  • 1 stick of celery
  • 300g baby button mushrooms
  • 2 large carrots
  • 2tbsp plain flour
  • 500ml beef stock
  • Salt and pepper to taste

For the oomph:

  • 4tbsp red wine vinegar
  • 1tbsp maple syrup
  • 1tbsp fish sauce
  • 1 or 2 bay leaves
  • 6 to 8 peppercorns

For the dumplings:

  • 100g self-raising flour
  • 50g of butter (cold from the fridge)
  • 25g grated cheese (I used a mature English cheddar)
  • 1tbsp chopped parsley
  • Pinch of salt
  • 1 – 2tbsp milk

Method:

For the oomph:

Put all the ingredients in a small pan and cook on a medium high heat until the liquid has reduced to about two tablespoons. Drain through a sieve to remove the peppercorns and bay and leave aside until later.

For the mince and gravy:

Heat a drizzle of oil in a frying pan.  Finely chop the onion and celery and add to the pan along with a good pinch of salt and pepper.  Stir regularly until the onion is just starting to turn a bit golden.  Peel and chop the carrots into generous chunks and add to the pan along with the mushrooms.  Stir together until everything looks glossy and the mushrooms are staring to colour.  Transfer the onions, mushrooms and vegetables into a large saucepan.

Put a drop more oil in the recently vacated frying pan and add the mince along with another good pinch of salt and pepper.  Brown the mince on a high heat until the pan starts to look dry and then sprinkle in the flour.  Stir thoroughly for a minute or two until the flour is incorporated and then transfer the mince to the saucepan to join the onions and vegetables.  Add the stock to the saucepan.  Ideally you want the mince and vegetables to be just covered so add a little bit of water at this point if you have to.  Add the oomph.  Cover and simmer on a medium-low heat for a couple of hours until the mince is melting and tender (you can also pop your mince and gravy into a low oven if you prefer).

For the dumplings:

Start making your dumplings once your mince and gravy is ready.  Put the flour in a bowl and add in the cold butter cut into small chunks (or grated).  Rub the butter and flour together for a few minutes until the mixture resembles course bread crumbs.  Stir in the salt, cheese and parsley.  Add the milk a little at a time and stir until the mixture comes together in a firm but sticky lump.  Form your dumpling mixture into little balls (I made about 10 golfball sized dumplings) and plop them in with the mince and gravy.  Do not crowd the dumplings as they will plump up as they cook.  Put the lid on the saucepan and continue to cook on medium-low heat for 12 minutes.

Serve generously in big bowls and ideally with a nice bottle of beer or glass of hearty red wine.

minceblog2 minceblog

Crispy breaded pork chops

snit3

Ingredients:

For the pork:

  • 4 boneless pork chops
  • 50g breadcrumbs (I used panko)
  • 2 medium eggs
  • Flour
  • Salt and pepper
  • Vegetable or sunflower oil

Method:

Trim the fat from the chops with a sharp knife.  Place the chops between sheets of parchment paper or fold inside a piece of clingfilm.  Using a rolling pin (or meat mallet) gently bash the chops until they are 1cm thick.  Take 3 plates – sprinkle one thickly with flour and season the flour generously with salt and pepper,  crack the eggs into another and lightly beat with a fork, and then onto the last plate put the breadcrumbs.

Take your flattened pork chops and first dip into the seasoned flour until well coated, shake of the excess and then dip into the egg followed by the breadcrumbs until thoroughly coated.  You can stop here if you like, but I like to ‘double dip’ by dipping the chops into the egg and then breadcrumbs for a second time – the final product will be extra crunchy!

Cover you chops and place in the fridge for about half an hour to set up.  Remove from the fridge and fill a large, deep frying pan with about 1cm of oil.  Heat the oil on medium high until a pinch of breadcrumbs dropped into the centre of the pan sizzle immediately.  Carefully place the chops into the pan (don’t overcrowd the pan – cook in batches if you have to) and cook for a few minutes on each side until crunchy and golden.  Remove from the pan and leave to drain on sheets of kitchen paper to remove the excess oil.

I served my pork chops with roasted broccoli and green beans, mashed potatoes and a simple gravy.

snit

Steamed mushroom buns and greens in miso butter

dumplr3

Ingredients:

For the dough:

  • 2/3 cup warm water
  • 2tsp instant yeast
  • 2tbsp sugar
  • 1tbsp sunflower or vegetable oil
  • 1 + 1/4 cup bread flour
  • 1tsp salt
  • 1/4tsp baking powder

For the mushroom filling:

  • 250g mushrooms (I used a mixture of chestnut and shitake)
  • 5 spring onions
  • 1 clove garlic
  • 2tbsp oil
  • 2tbsp soy sauce
  • 1tbsp maple syrup (or honey)
  • 1tbsp oyster sauce
  • 1tsp chinese five spice
  • 1/2tsp ground szechuan pepper

For the greens:

  • 1tbsp butter
  • 1tsp miso paste
  • Greens of your choice (I used a mixture of spring greens and baby bak choi)

For the dipping sauce:

  • 4tbsp soy sauce
  • 2tbsp maple syrup (or honey)
  • 2tbsp rice wine vinegar
  • 1tsp chilli oil (or more if you like it spice)
  • 1tsp sesame oil

Method:

For the dough:

Mix the water, sugar, and yeast in a bowl until the yeast has dissolved.  Add the oil and then stir in the flour and salt.  Once the dough comes together in a sticky lump, transfer onto a floured surface and knead until smooth (about 5 to 10 minutes).  Put the dough aside in an oiled, covered bowl until risen to double its size.

For the mushroom filling:

Heat the oil in a large pan on a medium high heat.  Finely chop the garlic and spring onion and cook until the garlic has started to turn golden.  Add the mushrooms and cook until reduced in size and the pan starts to look dry (about 10 minutes).  Add the remaining ingredients and cook for a few more minutes until rich and dark brown.  Transfer to a clean bowl and allow to cool.

For the dumplings:

Punch down the risen dough and separate into small walnut sized balls (you should have about 8 – 10).  Press each ball into a flat circle (about 4inches across) and pop a heaped teaspoon of the cooled mushroom mixture into the centre. Lift the edges of the dough to enclose the filling and pinch and twist the dough to seal.

Place each dumpling on a small square of parchment paper and leave aside for about 20 minutes under a damp cloth. Meanwhile, heat some water in a pan until simmering.  Load the dumplings into a bamboo steamer (or more than one stacked on top of each other) keeping them on the parchment paper pieces.  Leave to steam over the bubbling pan for 10-12 minutes.

For the greens:

Melt the butter in a medium hot pan until it starts to froth and bubble.  Add in the miso and whisk until it has incorporated with the butter.  Toss in your greens and allow to cook until just tender.  Depending on your miso you may need to add a bit of extra seasoning at this point.

For the dipping sauce:

Mix all ingredients in a bowl. Easy!

Serve the dumplings straight from the steamer with a little bowl of dipping sauce on the side.  Best enjoyed with an ice cold bottle of Tiger beer.

dumplr2

Chicken salad with tahini dressing

ChickensaladblogI

Ingredients:

For the salad:

  • 2 chicken breasts
  • 250g new potatoes
  • Bag of mixed leaves
  • 1/2 red onion (finely sliced)
  • 1 red pepper (finely sliced)
  • 100g green beans
  • 2tsp black sesame seeds

For the dressing:

  • 4tbsp olive oil
  • 2tbsp white wine vinegar
  • 2tbsp tahini (sesame seed paste)
  • 1tbsp honey (or maple syrup)
  • Pinch of salt and pepper (to taste)

Method:

For the salad:

Preheat your oven to 180c

Season the chicken breasts generously with salt and pepper.  Heat a small amount of oil (I like to use olive oil) in a frying pan and brown the breasts on both sides before transferring to the oven for about 15 – 20 mins until cooked through.  Leave the chicken aside to rest and cool.

Bring a large pan of salted water to a boil.  Add the potatoes to the pan and bring back to the boil for about 10 mins before adding the green beans and cooking for a further 5 mins until the potatoes are tender.  Drain the potatoes and beans and leave to cool (you can speed this process along by running under cold water).

For the dressing:

I like to make my dressings in a small jar.  Add all of the ingredients to the jar, pop on the lid and give it a vigorous shake so that all the ingredients combine.  Give it a taste and adjust the seasoning to your liking.  I find that any salad which includes potatoes benefits from a generous amount of salt in the dressing.  If you don’t have a jar you can simply whisk all of the ingredients together in a bowl.

To finish:

Cut the chicken breast into thin slices and mix together with all of the other salad ingredients and the dressing (all the ingredients come together particularly well if the potatoes are still a bit warm).  Sprinkle with the sesame seeds and serve with some crusty bread.

ChickensaladblogII

Honey-glazed Meatballs

Pork meatballs with spring onion and black sesame, coated in a sticky honey and soy glaze.

meatballsresizedII


Ingredients:

For the meatballs:

  • 6 good quality pork sausages
  • 3 spring onions (finely sliced)
  • 2tbsp black sesame seeds
  • pinch of chilli flakes (or more if you like things spicy)

For the glaze:

  • 1tsp sesame oil
  • 1tsp chilli oil
  • 2tbsp dark soy sauce
  • 2tbsp light soy sauce
  • 2tbsp rice wine vinegar
  • 4tbsp runny honey

Method:

Mix all glaze ingredients in a bowl and put aside.

Remove sausage meat from skins and mix all meatball ingredients together in a bowl (you may need to add some beaten egg if the ingredients don’t come together).  Shape the mix into small manageable balls (I like to keep them to bite-sized morsels because my chopstick skills are questionable) Pop the meatballs on a baking try and cook in a medium oven for about 15 minutes.

Remove the meatballs from the oven and whack the heat up to full.  Pour the glaze over the meatballs and return to the oven for 5 to 10 minutes, or until the the glaze has gone dark and sticky.

Serve with boiled white rice and stir-fried veggies.

meatballsresizedI