Cheesy pasta bake

pastabakeblog

Its normally around this time of year, with the days getting shorter and the weather getting cooler, that people start talking about craving ‘wholesome’ or ‘stodgy’ food – things like stews and bakes.  However, for me – and this may explain my, shall we say, well-upholstered physique – there is never a time of year that I’m not reaching for that packet of pasta or yearning for something stodgy and swimming in gravy.  This recipe is one of my speedy – and sooooo satisfying – staples, and one that’s delicious anytime of year.

Ingredients:

For the sauce:

  • 2tbsp butter (heaped)
  • 2tbsp flour (heaped)
  • 500ml milk (I used semi-skimmed)
  • 50g grated cheese of your choice (and a wee bit more for scattering over the top of your bake)
  • Salt and pepper

Other bits:

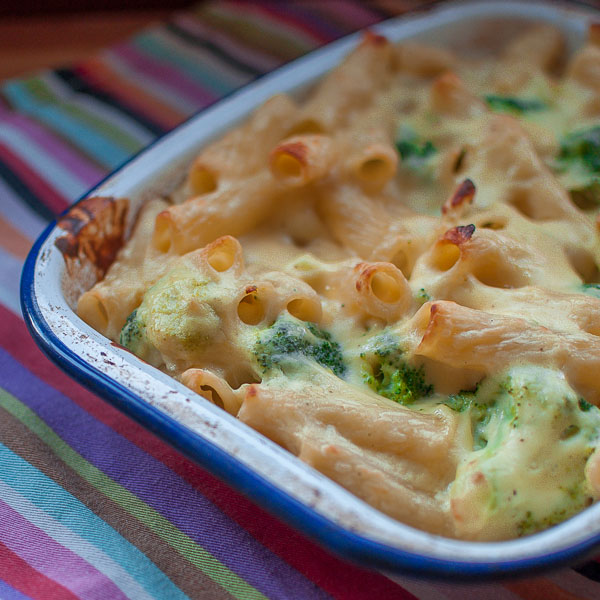
  • 250g dried pasta (I used rigatoni)
  • 1 ‘head’ of broccoli (or you could use cauliflower or a combination of both) – broken down into similarly sized florets

Method:

For the sauce:

Melt the butter in a medium hot pan until it starts to froth.  Add in the flour and stir into the melted butter to form a roux.  Keep stirring for a couple of minutes until the gloopy paste turns a shade darker and becomes golden.  Gradually add the milk and stir-stir-stir – the contents of the pan will turn super-thick and then thin out again.  Let this mixture bubble away for a few minutes until glossy and thickened, and VOILA – you have created a white sauce.

Remove from the heat and stir in the grated cheese (I used a wacky smoked Welsh goats cheese that was on offer in the supermarket) until it has melted away.  Return the pan to a low heat and cook for a few more minutes.  Taste and season to your liking.

Depending on how you are getting along with your pasta and veggies, you can either let the sauce blip away on a very low heat with an occasional stir, or remove from the heat and place a layer of clingfilm on top to prevent an icky skin from forming.

For the rest:

Preheat your oven to 180c

Fill a large pan with water and a generous amount of salt and bring to the boil.  Pop in your pasta and cook for 2 – 3 minutes less than the recommended cooking time.  When your pasta has about 3 minutes left to go (so about 5 minutes less than the cooking time on the packet – I hope you’re following?) add the broccoli to the pan.  After 3 minutes drain the pasta and veggies into a colander.

Mix the pasta, veggies and sauce in a large ovenproof dish or deep baking tray and scatter the top with more melted cheese.  Pop the bake in the oven and cook until the top has turned golden and crispy and the sauce is bubbling away at the sides (about 10 – 15 minutes depending on your oven).  I like to let my bake sit for a bit and cool slightly, to become a bit more solid and sticky, before serving.

pastabakeblog2

Pizza Buns

pizzatwistblog2

Pizza is my favourite.  My FAVOURITE.  If I had to choose my last meal, or if I could only ever eat one thing for the rest of my life, it would be pizza.  My desire to make my own pizza’s was the inspiration to begin baking bread at home and is the ideal place to start with homemade breads.  This recipe is super-fun and super-versatile.  I’m giving you the ‘basic’ sauce, but you can add whatever toppings tickle your fancy.

Ingredients:

For the pizza dough:

  • 200g bread flour
  • 50g semolina flour
  • 150ml warm water
  • 7g fast-acting yeast
  • 1tsp fine salt (heaped)
  • 1tsp sugar
  • 2tbsp olive oil

For the filling:

  • 500g carton of passata
  • 50g black olives
  • 1 small onion
  • 1 clove garlic
  • 1tbps tomato puree
  • 1tsp sugar
  • 1tsp dried oregano
  • 1tsp dried basil
  • 1tbsp olive oil

To finish:

  • 25g parmesan

Method:

For the sauce:

Heat the oil in a saucepan on medium high.  Veeeeeery finely chop the onion and garlic and add to the oil along with a pinch of salt.  Cook for a few minutes, stirring regularly until the garlic starts to brown.  Add in the rest of the ingredients (apart from the olives) and let the sauce blip away on a low heat until it is thick and rich.  Veeeeeery finely chop the olives and stir into the sauce.  Taste the sauce and adjust the seasoning to your liking.  Leave aside to cool.

For the pizza dough:

Put the water, sugar and yeast in a large bowl and stir together until the yeast has dissolved.  Add the flours, oil and salt to the bowl and stir together until combined into a sticky lump.  Transfer your dough to a clean floured board and knead for 10 – 15 minutes until smooth and elastic.  Return to the bowl and cover with clingfilm.  Place the bowl in a warm place until the dough has doubled in size .  Once the dough has risen turn it out onto a board or clean floured worktop and ‘knock back’ by giving it a good bash to force the air out.

Using your hands or a floured rolling pin roll the dough into a rough rectangle about 1/2cm thick.  Spread a thin layer of sauce over the dough (just like you would with a pizza) and grate over the parmesan cheese (its at this point that you can add your other fillings).  Now this is the messy bit – roll your dough up like a swiss roll, trying your best to create a tight spiral without all of your yummy sauce squishing out the sides.  Once rolled up, divide into 4cm thick portions and place – spiral up – on a lined backing sheet.

Cover with clingfilm and put aside for about 30 minutes to puff up once more.

While your waiting for your buns, preheat your oven to 180c.

Once the oven is hot, pop in your buns (make sure you remove the clingfilm) and bake for about 18 minutes until golden and crisp.

Eat straight from the oven with a side-salad (great if you want to convince yourself that you’re having a healthy dinner).  These buns are also great for snacking and for lunchboxes.

pizzatwistblog

Ginger, Lime and sesame cupcakes

sesamecupcakeblog2

So I had a little epiphany while watching The Great British Bakeoff.  When it comes to savoury cooking I’m quite adventurous with my use of flavours and techniques, but when it comes to sweets I tend to stick to the traditional – your chocolate, coffee and citrus.  Now while there is nothing wrong with the classics, I felt it was time to give my cupcakes a twist (oo-er) and try something new.  This recipe was inspired by the contents of my cupboards and being too lazy to go the the supermarket.

Ingredients:

For the sesame brittle:

  • 1/2 cup caster sugar
  • 1tbsp honey
  • 1/2 cup sesame seeds
  • Pinch of salt

For the cake:

  • 3 medium eggs (separated)
  • 1 cup caster sugar
  • 1 1/2 cups self-raising flour
  • 1/2 cup of sour cream
  • 1/2 cup of melted butter (left to cool to room temperature)
  • 1tsp baking powder
  • 1/2tsp bicarbonate of soda
  • 1 tsp ground ginger

For the sugar syrup:

  • 1/2 cup caster sugar
  • 1/2 cup lime juice (juice of 4 or 5 fresh limes)
  • 4 – 5 ‘disks’ of fresh ginger (you can leave the skin on)

For the icing:

  • 125g unsalted butter (at room temperature)
  • 250g icing sugar
  • 3 – 4tbsp sugar syrup

Method:

For the sesame brittle:

Put the sugar and honey in a pan and heat on medium high until the sugar has melted and turned golden and bubbly.  Be patient and resist the temptation to stir, you can ‘swirl’ the contents of the pan from time to time.  Stir in the sesame seeds and salt and pour immediately onto a baking sheet lined with greaseproof paper.  Leave aside to cool.  Once cooled, bash the brittle in a pestle and mortar to create a sugary, sesame crumble.

For the syrup:

Put all the ingredients in a pan and leave to bubble away on a medium high heat until reduced by half.  Leave aside to cool.

For the cake:

Preheat your oven to 180c.

Beat the egg whites in an electric mixer with the whisk attachment until firm and dry.  In a separate bowl mix together the egg yolks, sugar, lemon, yogurt and butter.  Add the flour to the egg yolk mixture along with the ginger, baking powder and bicarbonate of soda and stir to combine.  Finally fold in the egg whites with a metal spoon until the mixture is uniform in colour.  Transfer the mix into cupcake cases in a cupcake tray (about a tablespoon of batter per cupcake). Bake for about 12 mins until a skewer inserted into the centre of each cake comes out clean.  Remove the cakes from the tray and place on a wire rack.  While the cakes are still warm, drizzle on a tablespoon-full of lime and ginger syrup.

For the icing:

Put the butter in an electric mixer and beat on high speed using the blade attachment.  Once smooth, add in the icing sugar a bit at a time and continue to mix until the sugar is incorporated.  With the mixer still running add in the syrup and continue to mix for a few minutes.

To finish:

Sprinkle a layer of the crumbled brittle onto a plate or baking sheet.  Spoon a generous dollop of icing onto each cake.  Dip the cake into the sesame brittle so that the icing is all coated.

I served these exotic little beauties with a steaming cup of oolong tea (it seemed a fitting combination).

sesamecupcakeblog

Confetti Blends: Citrus Salt

citrussalt

As I continue on my journey to becoming a proper kick-ass cook, one of the things I’ve learned is the importance of seasoning.  I feel that, perhaps, its becoming a little bit untrendy to add salt to your food in recent years.  I’m not sure if this is a health thing or what – but I can say with great confidence that I am not jumping on board the no-salt train.  The no salt-train only leads to one destination, and that is Blandsville.

So – salt away my friends, don’t feel guilty for reaching for that little tub of sea salt.  Season at every stage of your dish and taste, taste, taste!

And what easier way of adding a bit of extra pizzazz to a dish than to sneak it in along with the salt, and what better way to bring us to the point of this blog – Citrus Salt.  I am an admitted fruit-o-phobe, my greatest nightmare is finding fruit in places it has no right to be – imagine my horror at discovering a raisin lurking in a curry dish, and don’t get me started with pineapple on pizza! But citrus fruits? Oh my. Manna of the gods.  Friend of of all creatures of the sea.

Ingredients:

  • 1 large orange
  • 2 plump lemons
  • 3 juicy little limes
  • 100g sea salt (I used Cornish Sea Salt)

Gadgets:

  • Spice grinder (I used my beloved Krups)

Method:

Remove the peel from your miscellaneous citrus beauties using a small, sharp paring knife.  Try to avoid the bitter white pith as much as possible and aim for long strands of peel.

Place your peelings on a large baking sheet and pop in a low oven (I went for about 80c) for an hour or two until everything has become stiff and dry, peak into the oven regularly to make sure nothing is burning.  Remove from the oven and leave on some clean kitchen paper for a day or two to complete dry out.

Whiz the peel in your spice grinder to form a fine golden powder.  Add a tablespoon or two of salt and whizz for a few more seconds.  Mix the ground salty peel with the remaining salt and voila!

Sprinkle liberally on seafood and veggies.

citrussaltblog42

Eating Out: Pizza Workshop, Bristol

pizzaworkshopblog

One thing.  Made well.  Thats the motto of the latest newcomer to trendy North Street in Southville, Bristol.  Boasting a menu of just 6 classic pizza’s (and one or two specials) does Pizza Workshop bring enough to the table (geddit!?) to compete with the big chain pizza delivery places already at home on the high street?

The restaurant itself boasts a casual aesthetic with Wagamamas style bench seating that has you shoulder to shoulder with your fellow pizza lovers.  The menu presents you with 6 classic, uncomplicated pizza choices, a million miles away from the crazy combinations and inch thick piles of toppings that you might find elsewhere.

Made with a thin, crisp sourdough base, the pizzas are topped with a tomato sauce that is made simply from crushed San Marzano tomatoes and finished off with Fior di Latte mozzarella – pizza purists rejoice!

I plumped for the Number 3 – a delicious combination of mushrooms artichokes and olives – and, while not the hubcap sized portion you might expect in the likes of Pizza Hut and Dominoes, I received a perfectly meal-sized pizza, a steal – in my opinion – for only £8.50.

So – the final verdict – do Pizza Workshop do that thing that they do, and do they do it well?  Well, the answer is a definite yes, and I look forward to returning to try options 1, 2, 4, 5 and 6 – though can a bring myself to ask for a number 2 (snort) in polite society?

Follow the link below for Pizza Workshop’s website.

Pizza Workshop

pizzaworkshopblog2